The first weeks of November were strangely mild and warm. Garden plants were still producing, and all the herbs were going strong (except the basil, which was pulled last month). My wall of tarragon, though raggedy and slightly frostbitten at the tops, had lush new shoots at the base. Mr. M's little hot-pepper plant was loaded with upward-pointing fruit, looking like a small scarlet firework springing out of the earth. The tomato vines had died back but the draggled stems somehow bore still-ripening tomatoes. The year seemed to be dozing in a pleasant dream, somewhere between summer-that-was and spring-to-come.
On Friday, everything changed. All day long we were buffeted by a boisterous southwest wind - so boisterous that trees groaned, doors flapped, and the old building where I work made eerie whistling noises. Temperatures were still in the 60s, but by late afternoon they began to fall. Sometime during the night the wind veered north, shed 30+ degrees, and, without slackening speed, picked up a small burden of snow to fling over the late-autumn landscape. Saturday morning we woke to a scattering of white on the roof and the ground, and the realisation that winter is only a month off.
In some strange way, it's a relief to have the weather finally behaving as it should. The late-lingering warmth was wonderful, and we took full advantage of it, but underneath there was a sense that something wasn't quite right. This is the time of year for cosy evenings spent with yarn and a hot cuppa, for early nights under flannel sheets - for hibernation, in fact. And as much as I enjoy cycling, by November I'm ready for the season to end; warm days make me feel guilty for not being out on my bike. When the weather turns icy, the pressure is off; I can let cycling go until spring, and enjoy freezing walks instead.
Is this urge to hibernate the effect of a northern climate? I don't remember feeling like this when we lived in Southern California. But here in Wisconsin, on a sub-freezing Sunday in November, I'm ready to fall asleep as soon as the sun goes down. (Which is about 5 pm these days.)
So I'll just post a few photos here, then take a book and head off to the bedroom. I have an appointment with some flannel sheets.
~
November sunset walk to the park, with rose-coloured ribbons across the sky...
...and an apricot sunset behind the lake.
~
Breakfast tacos, starring the last of the tomatoes and homemade tortillas:
~
Saturday morning: snow on the garage roof...
...and the ground. But the kale is still holding out:
~
Saturday afternoon: a chilly walk to the park. The snow has melted, but the cold and wind are unabated. At the park entrance is a Burning Bush with Christmas lights (already!) entwined in the branches:
A patriotic display:
Leaves huddle at the edge of the pond, with wind-whipped water behind. Soon this water will be frozen-still, and the leaves encased in ice:
Mr. M and I had an awesome trip to Bike MS Washington in September. (A Really Good Blogger would have told you all about it weeks ago, but this blogger was seriously slacking off - hence the very delayed report.)
It's a long drive from Wisconsin to Washington State, and we allowed for plenty of stops along the way. One of those stops was in Rapid City, South Dakota, where we were privileged to see a very famous rock group - possibly the most famous American rock group ever.
We drove up a winding mountain road...
And through a rocky tunnel...
Suddenly, after rounding a curve, the Famous Rock Group burst upon our sight! We could hardly believe we were seeing them in the flesh.
These are the kind of Presidents I like :)
A little farther up the road, we turned off for Mt. Rushmore National Park. We paid the parking fee, and headed towards the entrance.
The grounds of the park are very thoughtfully laid out; nearly every point is a vantage point, designed to highlight the amazing central sculpture.
Approaching the very beautiful Avenue of Flags:
Each state is represented by its flag, and carved on the pillar beneath are the state's name, order of admission, and date of admission into the Union of States.
But the Rock Group is definitely the main attraction.
Selfie with Famous Rock Group
Just as Rome wasn't built in a day, the carving of Mt. Rushmore took many years and many hands:
The detail on the sculptures is amazing. Look at Teddy's pince-nez, and the lifelike glimmer in Abe Lincoln's eyes:
After marvelling from the Viewing Terrace, we walked the roughly circular Presidential Trail, which winds across the base of the bluff, offering spectacular, many-angled views of each President's face, with signboards giving details of the life and achievements of each.
There were also plenty of gorgeous rocks, trees, and views across the Black Hills, looking out over the South Dakota plain.
And wildflowers. :)
Seeing Mt. Rushmore in the flesh is like seeing Big Ben or (I imagine) the Eiffel Tower or any other iconic landmark for the first time. There's a sense of delight and wonder at finding that it's really real. And despite the myriad of photographs already taken by others, it's irresistible to anyone with a camera. It's huge; it's heart-warming; it's beautiful and noble and stirring and awe-inspiring and, quite simply, captivating.
I've always loved my country, but seeing Mt. Rushmore somehow made me love it just a little bit more. We felt blessed to visit this National Memorial, and a little sad when we had to say goodbye and head back down the mountain.
We hope we can go back someday. It's definitely worth the trip.
Yesterday I took a bike ride, and got home almost before I left.
How can this be? Did I suddenly attain some kind of cycling super-power? Have I trained so hard that I can now exceed the speed of light? Or was there a rift in the spacetime continuum? (Not that I know what that means, but it sounds really cool.)
The answer is not that exciting, I'm afraid. Yesterday was clock-setting-back day here in the US; to be more precise, the end of Daylight Saving Time. In short, it was the day the government kindly gave back the hour they took from us in the spring.
I have a long-standing beef with Daylight Saving Time. Why do we keep up this ludicrous custom? No amount of clock-fiddling can increase or decrease the available hours of daylight. Why torture our circadian rhythms every spring and fall by pretending it's later or earlier than it is? Why mess up train, plane, work, and meal schedules everywhere with the spurious idea that 2 o'clock is the new 3 o'clock? (Or vice versa.)
The spring time change is bad enough, but for those of us in northerly climes, the fall time change might be even worse. Think of it: every year we get through a long, dark, cold winter on the hope of the lengthening days to come. We revel in those few short months of summer warmth and summer light, when the sun seems to stay awake as long as we do.
Then September comes, and with it a faint uneasiness. The mornings get chilly and dark, making it harder to get out of bed. Sunset creeps ever closer to dinner-time. But the days are still warm enough to fool us into thinking that summer isn't quite over, so we foolishly head outdoors for a little evening gardening, having forgotten that twilight now falls at 6 o'clock (or what we've been tricked into thinking is 6 o'clock). Meanwhile the mosquitoes, who haven't yet quite died off, laugh quietly and sharpen their stingers....
And then BAM! It's November. The false dream of DST ends; suddenly it's dark at 4 in the afternoon. How cruel is that?
Since Mr. M and I must (as law-abiding citizens) play these foolish games with time, we like to make the most of it. In spring, when we're more or less forced to yield to the inevitable, we set our clocks forward with a sigh on Saturday night, and make do with a nap on Sunday afternoon.
But in fall, we're a little more rebellious. We've done without that hour for months, and now that we're finally getting it back, by golly we're going to spend it on something we enjoy. So we wait until Sunday to reset our clocks, meanwhile revelling in the luxurious feeling of knowing we've got a whole (albeit mythical) hour to use, and a whole day to use it in, any way we like. (Saturday-night church is a great help in this regard, as it spares us the necessity to be anywhere "on time" Sunday morning.)
So I used my extra hour for yesterday's bike ride - and that is how I was able to get home almost before I left. It's probably the closest I'll ever get to real time travel.
~
Here are some of the things I saw on my ride....
Scarlet leaves against a grey-and-green wood:
My own long shadow stretching eastwards:
Sandhill cranes, flying from the cold to come:
A leaf-edged road stretching into November:
Tallulah performing feats of balance on a dry oak leaf:
And trees contemplating their own svelte and elegant autumn reflections:
~
What did you do with your extra hour? (Or what would you do, if you had one?)
(How's that for a Really Long Title? When you haven't blogged in 2 months, it's good to come back with a bang....)
I've been messing about with I-cord lately, and stumbled on what may be the easiest method ever for a simple 2-stitch I-cord. Here it is....
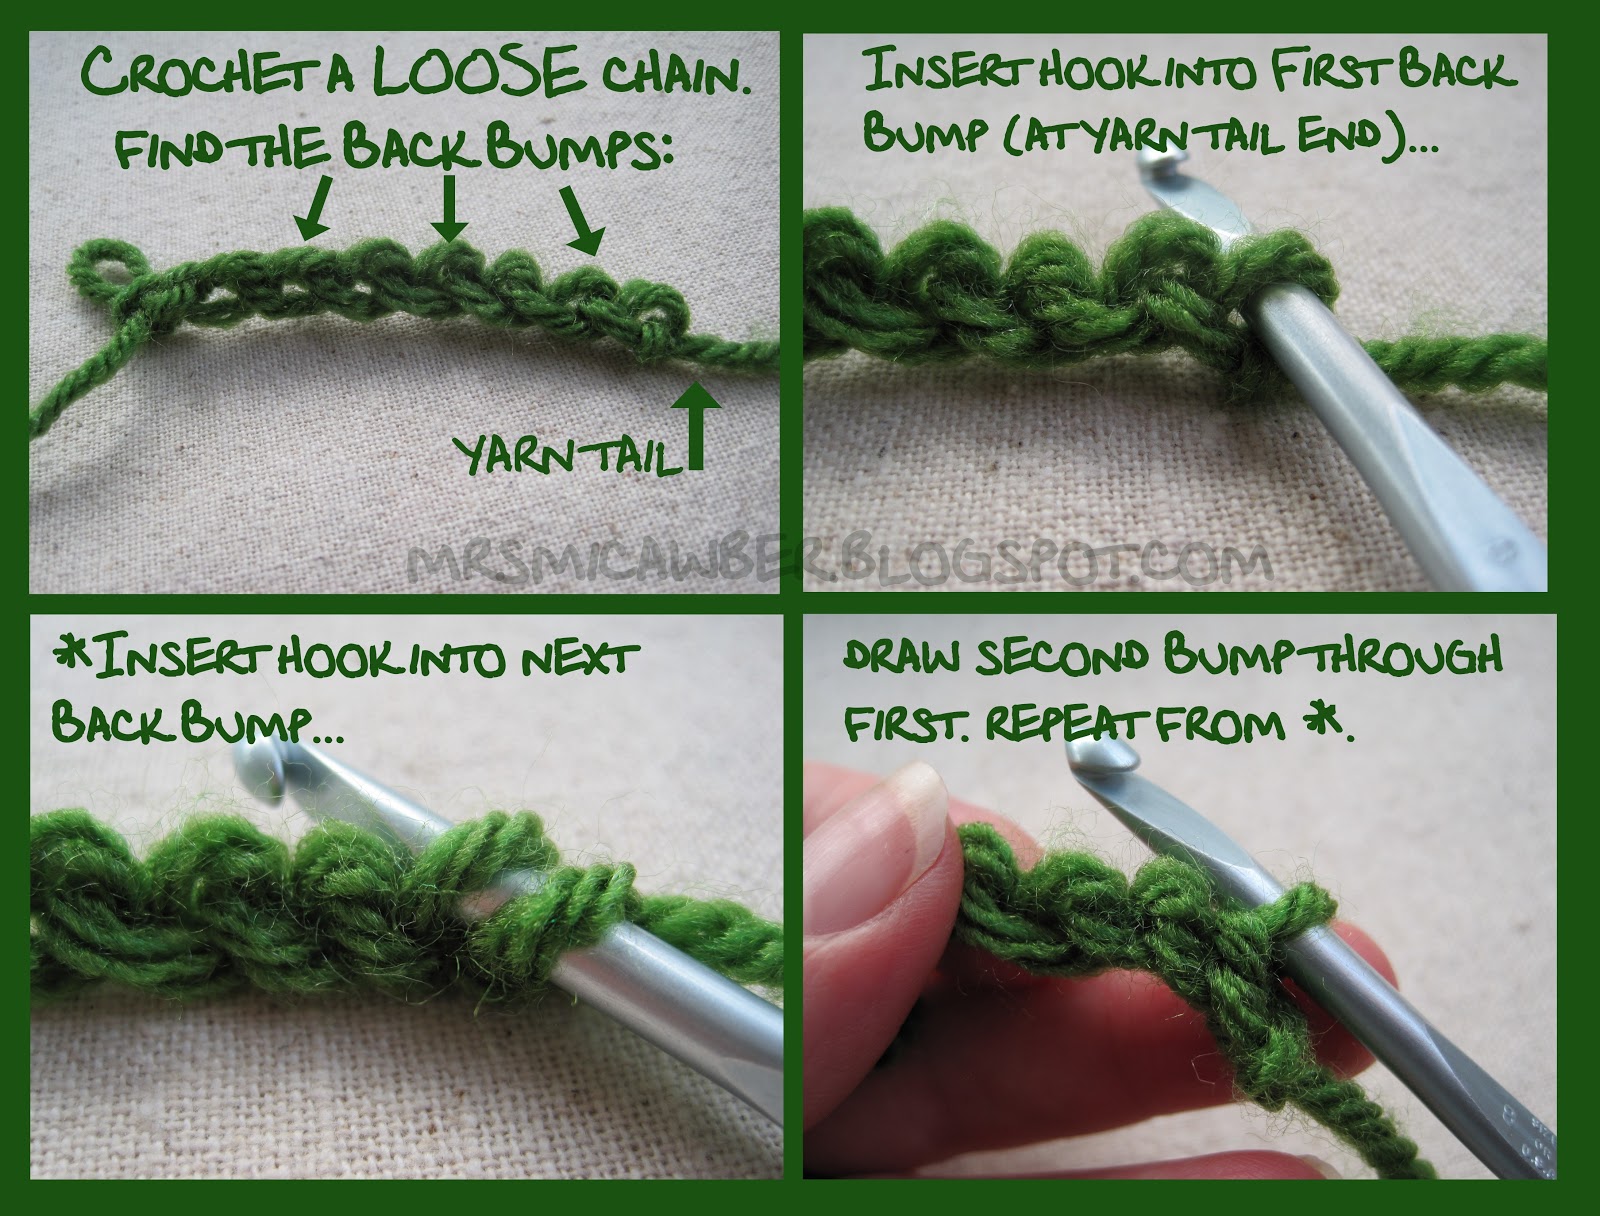
Step 1: Take some yarn and a hook, and make a VERY loose chain of any length. Remove the hook from the working loop.
With the starting tail in your hook-holding hand, and the empty loop in your yarn-feeding hand, turn the chain over so that the back bumps (or "back ridges") of the chain stitches are on top.
Now comes the crazy part. Let go of the yarn tail and the working yarn - you don't need themany more.
Step 2: Insert your hook from front to back through the first back bump, nearest the yarn tail. *Insert the hook from front to back through the next back bump (2 loops now on hook). Gently draw the second loop through the first. Repeat from *.
How crazy simple is that? Not to mention fun.
So fun, that immediately a cry goes up from around the blogging world....
This Cord is Too Short! I Want More! Okay - let's make it longer!
You've got an I-cord with two loops at the end - we'll call them the "yarny loop" and the "opposite loop". (The yarny loop is the one with yarn coming out of it.)
Insert your hook into the opposite loop, and gently tighten both loops until they're about the same size as the loops under them. Make sure the working yarn is behind and between the two loops.
To start the new Step 1 column: if desired, gently pinch the yarny loop with your yarn hand, just to keep it from pulling loose. Working on the opposite side, chain 1 with regular tension, then continue to chain Very Loosely to your desired length. (You can let go of the yarny loop any time after that first chain is made. It will just hang there until you're ready for Step 2.)
When your new Step 1 stitches are complete, turn the chain over as before. Insert your hook into the hanging-loose yarny loop, being careful not to twist it. Skip the small back bump (the normal-tension one) from the first opposite chain-1, and insert your hook into the next back bump. Work Step 2 as above.
Making the I-cord longer
Now I can hear someone yelling:
My Back Bumps are Too Small! (or, My Cord is Too Tight!)
If your cord is too tight, there's not enough yarn in your Step 1 stitches. This is a tension issue.
To relax your tension, try any of the following:
Taking a warm bubble bath
Pinching the "back" yarn with your fingers while drawing the loop through on each chain stitch (being careful not to tighten the previous chain stitch)
Using a large hook for Step 1 and a small hook for Step 2*
Chaining around a hook or knitting needle to enlarge the back bumps (see video for example), then removing the hook or knitting needle before completing Step 2
Twisted stitches can also cause tight I-cord. To avoid twisted stitches, be careful to follow the directions as written, and make sure your hook and your loops are properly oriented.
*I-cord is amazingly forgiving stuff. I've worked Step 1 and Step 2 with hooks that were 4 to 6 sizes apart, and the cord came out beautifully even. A few tugs is all it takes to settle the loops.
Two ways to get looser tension
Far away and faint, a voice is hollering:
Aack! My Cord Is All Floppy and Messy!
Floppy I-cord means there's too much yarn in your Step 1 stitches - also a tension issue.
To increase tension, try:
Thinking about American politics
Using a smaller hook
Simply chaining a little more firmly
And Now for a Bit of Theory - How the Heck Does This Work? In standard I-cord construction, stitches are worked in spiral rounds, one row/round at a time. But Crazy Simple I-Cord stitches are worked one column at a time. The first column is formed by the loose chain stitches. The second column is worked afterwards, using the leftover (slack) yarn from the first column. That's why you have to chain so loosely - each chain has to have enough yarn in it for two stitches.
It may seem like a crazy method, but the result is a true I-cord, identical in structure to its knitted counterpart, and much easier (for crocheters) to produce.
Could this technique work with more than 2 stitches? Yes - but it's rather awkward, due to the amount of slack yarn required. (There may or may not be a future blog post about this. But after extensive experimentation, I can confidently say that for 3-stitch or larger I-cord, the established methods are probably the best.)
Crazy Simple I-cord makes a beautifully square, even cord - sturdier and more elastic than a regular chain, less laborious than a chain-and-slipstitch cord. It would make an elegant drawstring, or a lovely first row for any crochet project. (Note: although it's rather stretchy in itself, it won't provide a very stretchy edge. Foundation stitches are probably your best bet for that.) Multiple I-cords worked in chunkier yarns could be woven or knotted into a striking accessory.
In short, Crazy Simple I-cord is a great little technique to add to your crochet repertoire. Try it for yourself and let me know what you think. (Be sure to play around with different hook sizes to get the results you want.)
~
Oops! I nearly left out the Bonus Technique:
Super-Sturdy Mock I-Cord Follow directions in Step 1, above. Then work Step 2 in reverse, starting at the working loop end, and going back towards the yarn tail. That's it!
Mock I-cord looks like regular I-cord on two sides only - the other two sides look something like a jewelry chain. It's less stretchy than regular I-cord, and, if worked to a moderate tension in Step 1, can be amazingly firm. It resists ravelling (in fact it can be very difficult to unravel - you've been warned!). The only real downside is that you get what you get: there's no lengthening process for a Mock I-cord. So make a good long chain in Step 1, and remember that it will shorten up considerably in Step 2.